In the previous post, I was talking about some of my favorite entries that are hugely underrated, yet they have some meanings for me and help me to rethink about music. When I was writing the previous post or when I was listening the past entries, I often remember and take a peek to this little piano track:
For some reasons, this particular track and laser canon seem to be more memorable than some of the other entries since there are some good ideas with the melodies, and what it needs is some improvements in term of the instruments textures and the details and how they are accompanied. Thus, granted with Andrew Williams (aka Artinum) who is the composer behind the Piano entry, I decided to write some tips about how to write a better track in SunVox.
Part 1: Try to understand the track
Before we doing any improvement into the track, we must know what is the characteristic and the good things about it; otherwise, we will just flexing with music theory and sound design for the sake of flexing, which is not respectful for the original composer.
The first good thing about the track is the proper use of four bar phrase with variations, as you could divide that phrase into four sub-phrases which in music theory, we usually call them motifs which are fragments of melodic sequence. Meanwhile, this particular four bar phrase isn’t played throughout the whole piece, as you could hear that a new phrase are introduced at 0:24, played in minor to add little color to shows that there are something happened, but at the end, it is still resolved happily and peacefully.
The second good thing is the use of inversion of chords. Some people might write the chord always starting from the root note. Sometimes, they are not an issue since all the note related to the chord still holds up, but if we have some large chord interval jumps like C major to G major, or to F major downward, this jump will cause the brightness of the chord being inconsistent, and it might clash into the right hand. With a simple nudge to the top or bottom note below or above an octave respectively, this could mostly solve the mentioned two problems.
These two things above means a lot for music composing since writing a four bar phrase is not an easy task for many beginners without knowing the key concepts, so are inversions that many people tend to pick the chord with a familiar hand shape while bringing a particular note up or down by an octave seems counter intuitive at first. Though, with a good melody alone is not enough since they are a couple of things to form something impressive, including:
– Use of instruments
– Song structure
– Accompaniment
Let’s look at these metric in depth, to see what we could do better.
Part 2: Finding the improvements we could apply
To improve a piece or track, we also need to know what is the less desirable bits, so let us have a peek to the instruments first.
Clearly, the first things I have noticed is the harshness of the piano where every note sounding like playing in the full velocity, similar to the Korg M1 Piano. These kind piano samples do sound great for house music which was an iconic sound at its time while these genre needs that powerful percussive sound to break through all the electro instruments, but for a more classical setting, piano usually goes softer in lower velocities, so we need to find some ways to improve the quality of the piano.
What about the instruments around the piano? Around 00:48, we have a simple analog generator preset for the chord of the original piano sequence, along with the classic, vanilla sounding drum synth and a noise created by a generator. It does create some playful feeling to the track, but the drum synth and the noise might not fit with my new softer piano sound, but due to the title of the music and the focus of my post (also because the amount of time I have), I am going write this with a new piano sound only (for now) because if we have done right, even a single piano could sound awesome.
In terms song structure, it evolves around the similar idea by adding additional instruments, theme A all the way down, and this music structure alone is quite common since it even is used in some of the soundtracks like Time by Hans Zimmer, Freedom Fighter by Thomas Bergersen, and many more cinematic works which could be epic if the structure is used right; nevertheless, the piano piece doesn’t aim at that epic feeling, so we are going for free and peaceful direction, respecting to the original theme of the piece.
Moving on to accompaniments: Obviously, this is the weak part of this entry since the left hand part of the piano is a bit basic and static, consisting only chords. It could still be a good idea if we do ambient which the texture of the sound is defined by the timbre of the synth, but for piano, the raw sound is a bit static, basically a pluck sound viewed by the synthesizer perspective; thus, we need some articulations and patterns to make it more interesting, which is the aim of this article.
Hence, let’s see what to do for the things above.
Part 3: Improvements taken place
Let’s start with the piano alone since this is the center piece of the whole track. Normally, we could simply do more sampling with more piano samples, and sample per key with round robin is ideal (I am also thinking of opening a post about sample instrument since there were interests about how I did it); however, since it was a 2021 SunVox Compo entry, endlessly adding samples is forbidden due to the 64k zip requirement; thus, to respect the original Compo Rule, we need to replace the piano with something light and convincing.
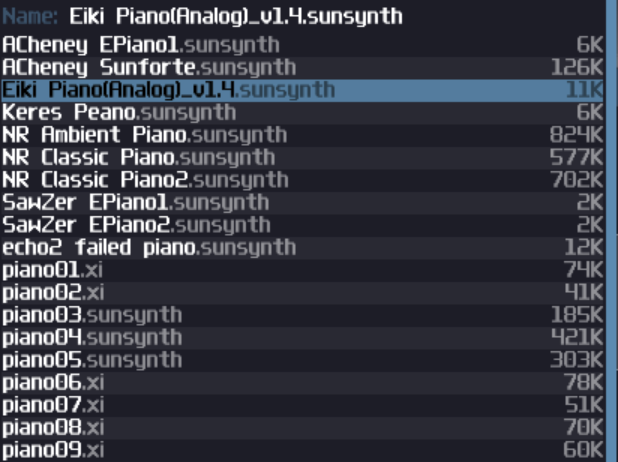
There is a good candidate for our situation: In the built-in instrument folder in SunVox, we have a quite convincing and soft sounding piano synth called the “Eiki Piano” while it is light in storage, consisting only 11Kb.
Of course, you could also use my 2nd order Kaplus Strong which is used in my Mech Haven Track, but since it requires manual voice management, while round robin mode didn’t exist in MultiSynth for that version of SunVox, so for the sake of simplicity and to respect the original setting of SunVox back in 2020/2021, we are going the use Eiki Piano instead. If you use other modules that have raw piano samples, you may attach a reverb after the sampler to get a richer sound, resembled as a piano in a hall.
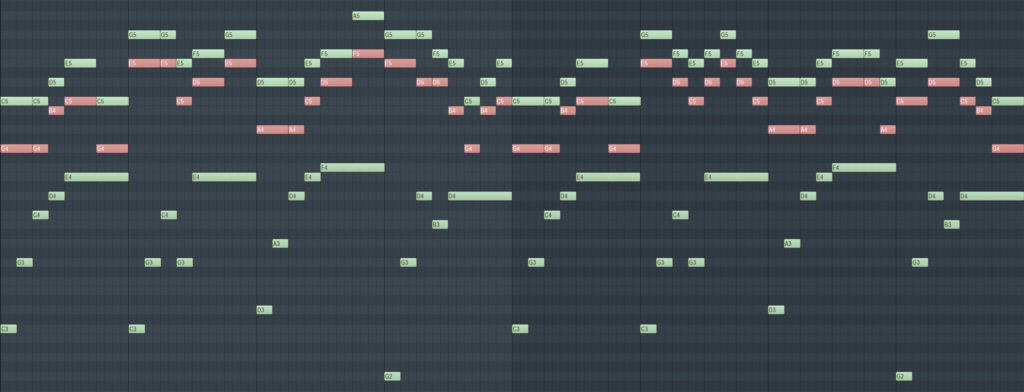
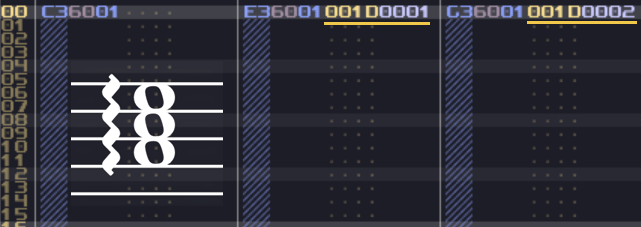
For the intuition, I will use piano roll to show the arrangement before we have putting them into the Tracker view so that it is easier to understand what specific changes and patterns are used for the melody. Despite the use of piano roll, all the audio samples are written in SunVox and my keyboard. Starting the original arrangement after the chord applied:
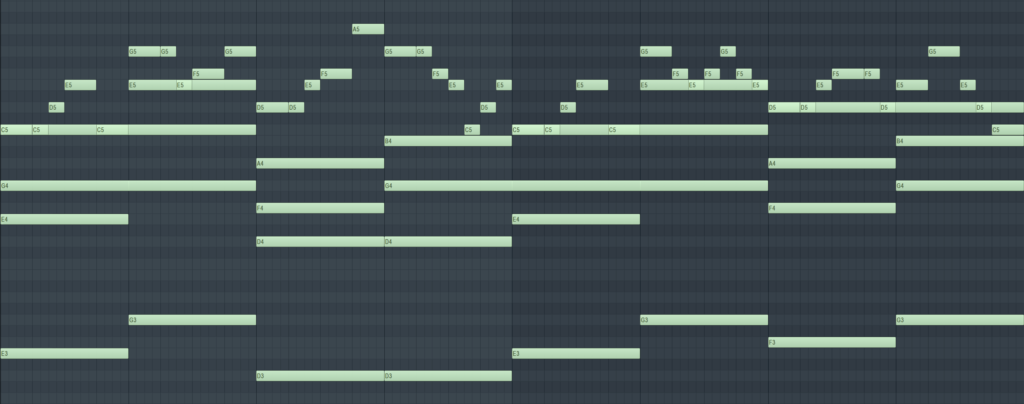
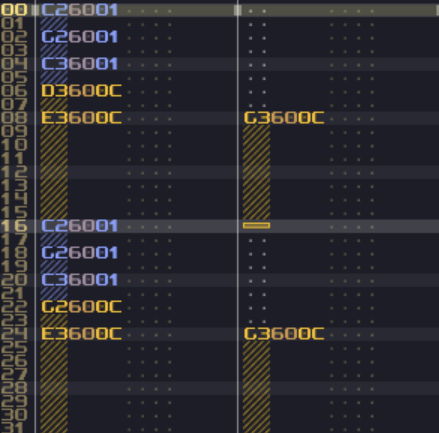
This is the initial arrangement when the chord are introduced. While the melody is fine (if not actually pretty nice since I have some interesting ideas with it), the left hand part is a bit problematic since it contains a bass and a chord, and this is impossible to play unless we have a bass pedal like an organ or a Doppio Borgato. (No, I am not going to make an Octopus joke here) Some people would suggest that moving the left hand quickly from the bass to the chord with a bit of damp pedal could solve it, but the process still introduce a tiny delay during the movement, thus impossible to play as shown as the piano roll described. Therefore, we need to find a better and more realistic left hand patterns, and let’s remove the bass first, only exposing the chord with aligning to the similar region:
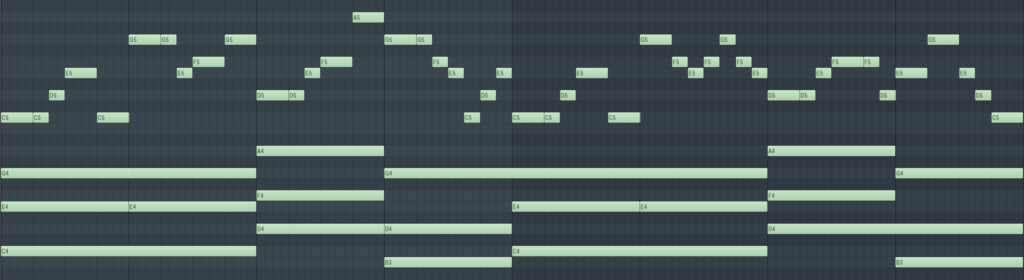
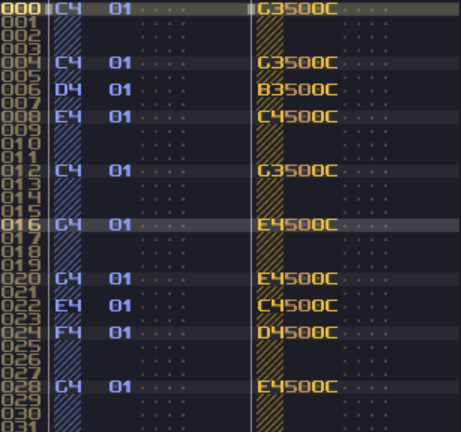
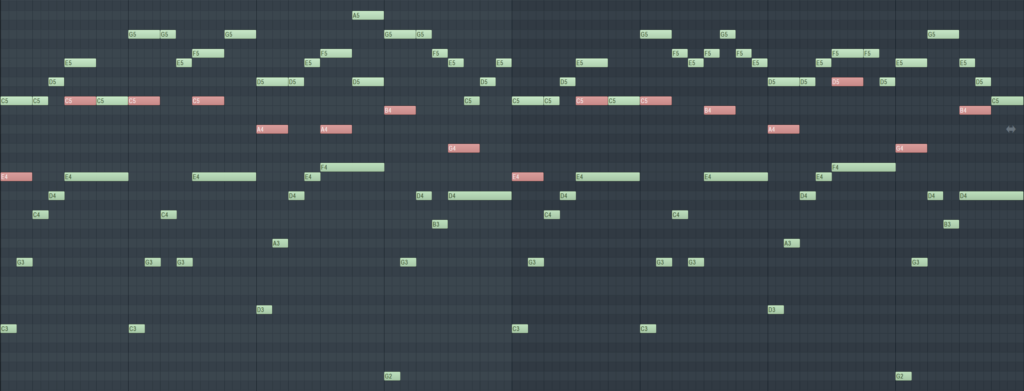
In this arrangement, although we have lost the deep bass, this version is now playable with our hands. During the process, I also have found out the chord progression, which is C major x2 -> D minor -> G major. Since G is the fifth note in the C major scale, aka the dominant note, we could swap it with a Dominant 7th chord as shown:
With this progression, we could now start with some classic textbook examples and let’s see how we can expend the idea from these examples. Chord only accompaniment could work in some cases, but this melody is rather uplifting, so it needs some movement to shine. Thus, the first simple trick is to break the chord into two parts, alternating between the bottom and the top two notes, known as broken chords, and here are two of the most common patterns in “Everybody Likes the Piano” commonly used in Marching and Polka music:

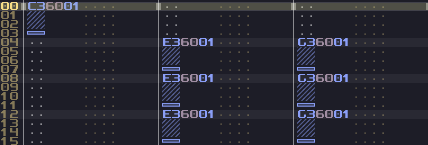
You may wondering… How to program that into SunVox? The chord examples were simple, so I didn’t show the tracker representation, but with the broken chord example, we could simply split the original chord into the base note and the top remain notes, playing them alternately while leaving a little stopper to detach each of the repetition, as shown at the right.
Besides, you might wondering why I have applied the velocity of 60 for the left hand part. This is all about the focus of the piece since if we have applied the same force to both left and right hand, the bass part of the piece could be overwhelming, covering the higher, softer melodies. Thus, to shift the focus onto the melody, we need to play the bass part softer, thus the velocity reduction.
We could play all the notes in the chord individually too, similar to the arpeggio command but slower. The following example showing the two iconic patterns for 4/4 time signature: up and down, and alberti bass (with slow and fast examples):
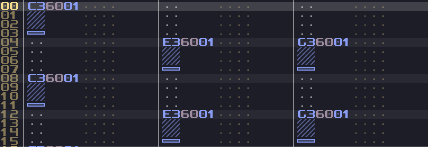
In SunVox, based on the previous marching pattern, we could change it into up and down or alberti bass pattern by selecting either one of the notes from the top part. You may double the speed, play the pattern for every two line (without the stopper), to give the piece a faster movement.
Since these two patterns play only one of the notes from the chord, you could just collapse the sequence into a single line, and this could not only make the pattern more compact, but it is also easier to program with a typing keyboard.
Some trolls: “oF cOuRsE, wHo DoN’T eVeN kNoW tHeSe PaTtErNs, LoGiCkIn?”
Well, this part has only covered the two basic ways to break a chord, to give the piano piece a bit more movement, and this is where the fun begins since we can now mix and match two concepts above to create a more complex accompaniment, not to mention the use of wider octave ranges and some additional pauses and rests.

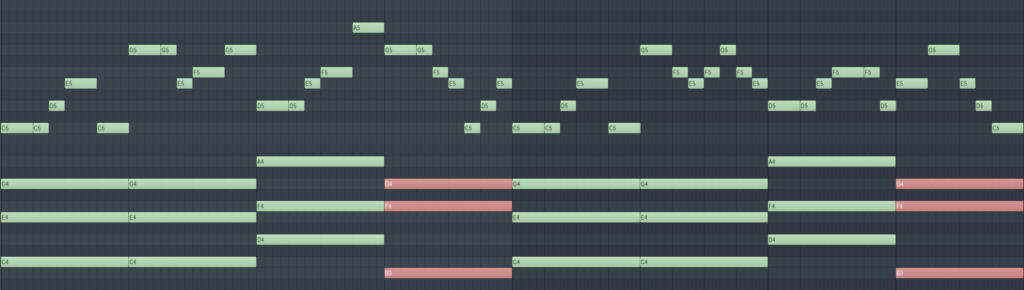
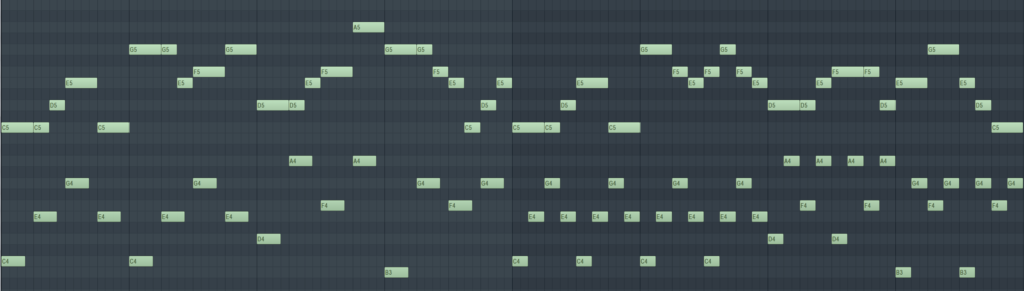
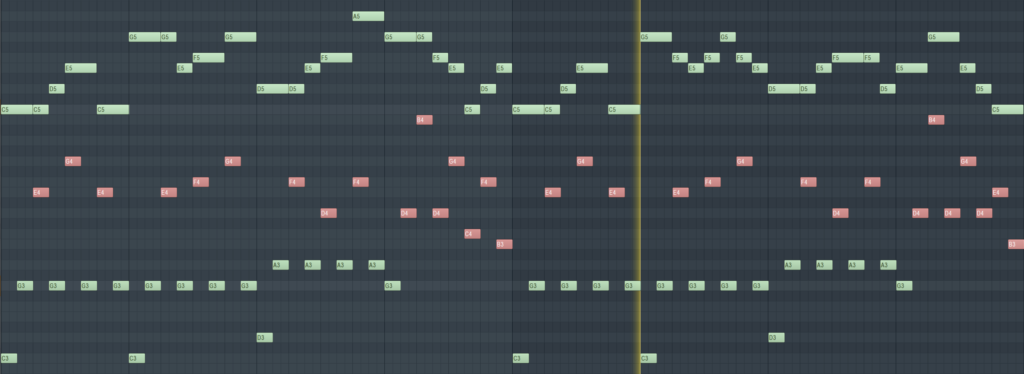
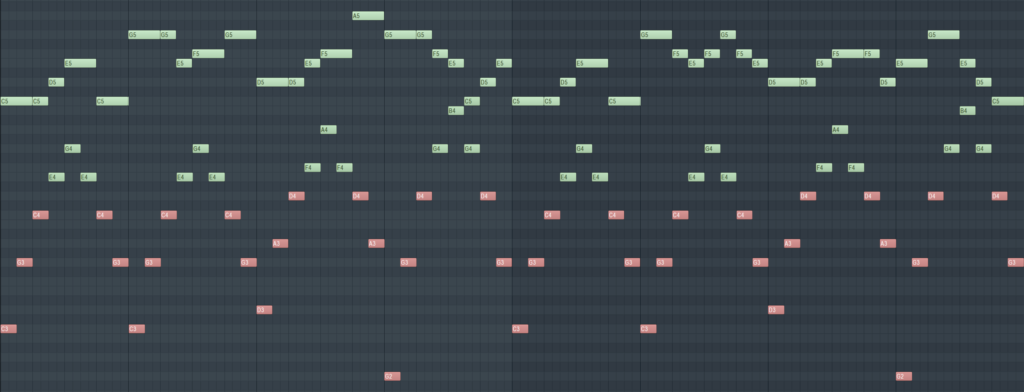
Let start with the simplest but the most effective change: starting with an alberti bass, and instead of playing the middle note at the same octave, play it one octave above. Congratulations!!! You now have the iconic accompaniment that Richard Clayderman uses all the time! Nevertheless, with this simple modification, the middle note might clash into the melody, so we could fix it by lower the whole left hand part by an octave. (There are some rules to determine the octaves, but we will cover that in the later parts)
Additionally, with the new top note, since it is in a higher register, you may play some counter points or counter melody that plays well to the main melody. I have also changed the middle note for the fourth and eighth bar, to match the melody playing in harmony, so you need to break the chord rules sometimes to get a better result, and this process is up to your intuition and feel (and It is easier when you have a midi keyboard to mess around):
Though, because of the introduction of the counter point and counter melody, we have a new focus on the left hand, and we need to evaluate the priority of which part of the accompaniment is more important for the main melody.
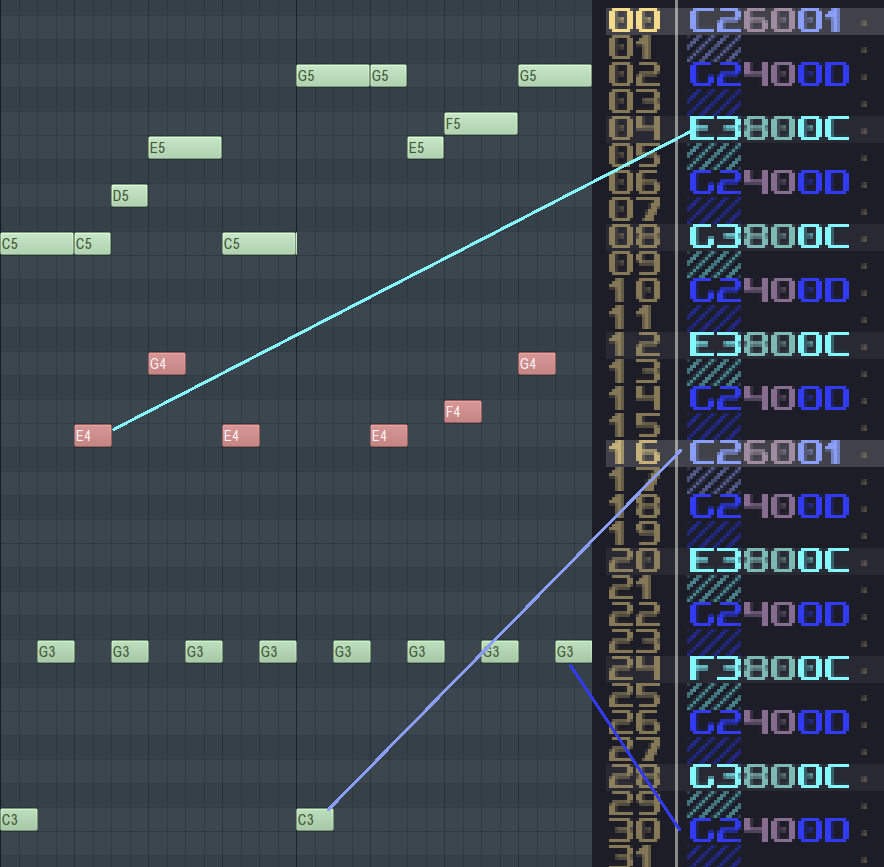
For me, since I want the counter points play with the melody, I decided to weight it same as the main melody. The bass of the accompaniment is deep and strong, so we could lighten the bass note a little, making the piece less muddy. There are a series of repetitive notes, ranging between G3 and A3, which they don’t have as much meaning and artistic values as other components, so we could play those notes softer then the counter point and bass, acted as fillers. Thus, you could see the velocity order of the example above as the following:
Counter Point/Melody > Bass > Repetitive Fillers
Usually, my former example is some of the most common ways to prioritize voicing, but it is the matter of your taste and feel in music, and these order and emphasis are up to your interpretation and the style of your music since different people have different understanding to the voicing. If you have paid attention to the pianists, you may notice that even the same piano piece, some pianists have emphasized some part of the counter melodies, and some emphasized other lines.
Let’s move on to the next pattern: I guess some of you have listened the Mariage d’amour during reading this article since I have linked the music in one of the examples above, and when you reach around 0:50, you might found that the left hand pattern has changed, and now I am going to talk about it.
Let’s consider the simple up and down arpeggio pattern, which it doesn’t sound impressive initially, but what about increasing the octave range? Let’s play a little bit with the octave range increment as the following:
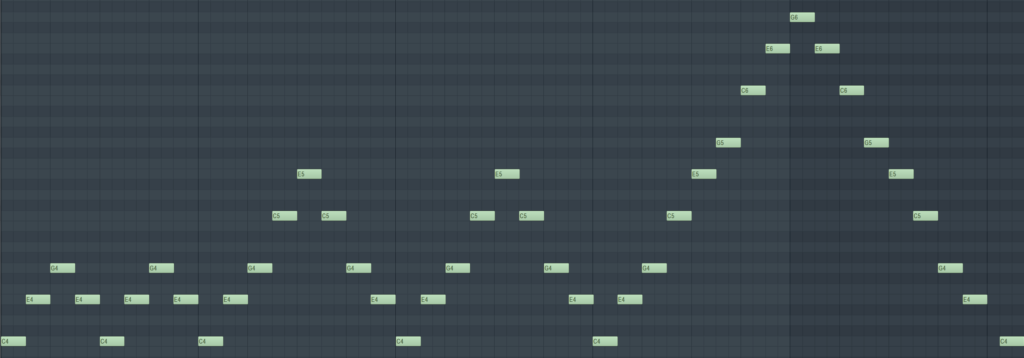
Larger the octave range, grander the sound, so let us use the two octave range for our melody! Well, there are some problems with this pattern, and let’s listen the following example:
Wait… why is the bass blurry? Didn’t my notes are all right in the triad? When we play a triad chord at the low region, the chords appear muddy since lower the frequency, narrower the frequency difference. For example, with an A minor chord, you play the chord at A4 which is 440 Hz, the relative C5 note is at 523.2511Hz where the difference between two is around 83Hz; however, when you play the chord 2 octaves lower, at A2 = 110Hz, the frequency between C3 is around 20Hz, much closer to the root note, thus the clarity lost:
Therefore, when we write arpeggio (and even chords) in a larger range, we tend to apply larger interval jumps at the lower notes, usually a fifth or even an octave, to give the bass and the fillers a bit more clarity:
Sometimes, we don’t need our accompaniments this busy though, and we may add some rests and holding notes after they have climbed the arpeggio ladder, which is useful for some more romantic or calming piece:
Now we have something decent for the accompaniment, and these patterns are not difficult to program into SunVox too.
When you program the arpeggio, all you need to do is to insert the notes of the chord in ascending or descending order, and after you have repeated the same note of a chord, bump the next insertion to another octave. If you have reached at the low region, remember to perform a bigger jumps in fifth or and even an octave to avoid the muddiness.
Once you know how to build the basic arpeggio, you may remove the last three notes and let the top note of the arpeggio plays continuously, leaving some room for the melody to breathe, or you could extend the accompaniment with the next trick I am about to talk.
When to add pauses and rests? There is no clear answer and it is up to your feeling about the music you made, and we will talk about that later as well.
Remember the Marching broken chord example? We could apply some chords* into our previous arpeggio pattern too. In this example, we may apply some chords* at the end of the arpeggio like shown:
* more precisely, two notes can only form interval and it needs at least 3 notes to form a chord, but since it can be mistaken with the interval in sequence, I decided to use “chord” to refer intervals that plays at the same time.
To program the sequence in tracker view, we could take our previous paused arpeggio example and replace the last note of the bar with a two note interval included in the respective chord. To prevent the previous note plays into the next bar, a stopper is needed if the first row of the next bar remains empty. To have a smoother transition between intervals and arpeggios, sometimes I want to prevent the note before the chord hitting the same note as the chord, and I might apply some notes that leads to the chord or closest lower notes of the chords.
At this point, you have already known most of the basic left hand writing for your piano pieces, and not only you could write a better accompaniment, but also these patterns help for you to improvise your music for inspirations. Many of the more complicated stuff are the variation of the things above.
Now we have quite a decent accompaniment for our work, but… the melody is now a bit bland, so we could start with some techniques that makes the melody more interesting.
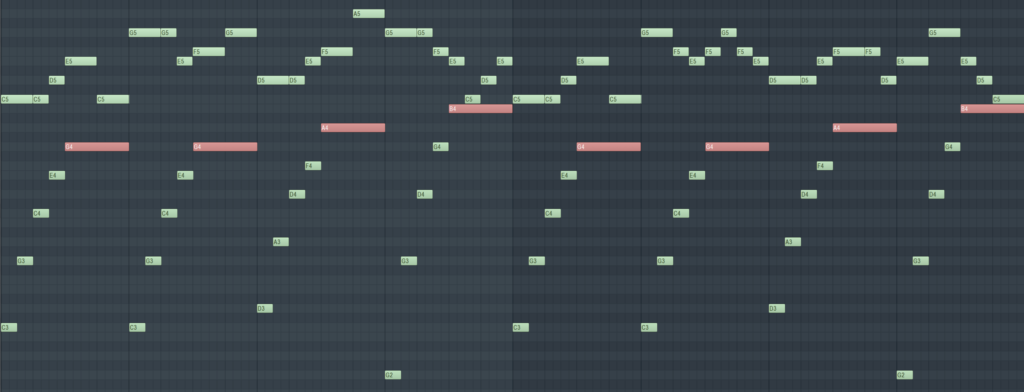
If we can press some chords with our left hand, so are our melody side, so let’s add some 3rds and 4ths under the melody, which is one of the cases of counter points, where this trick is well-known in Tetris Theme A.
With some simple counterpoints, it adds activeness and excitement into the melody. You may notice that I used 4th for some of the notes while 3rd for others, and there is usually a rule of thumb a downward 4th is used when the current note of the melody is at the root note of the chord. (unless you have used more complicated chords) It is not a good idea to use multiple perfect 4th and 5th in different pitch in a row since they could sound a bit weird in many scenarios.
Besides, when you are doing counterpoints, it is generally a better idea to play it with a softer velocity so that the counter point won’t take the center of attention from the melody, but as an enhancement.
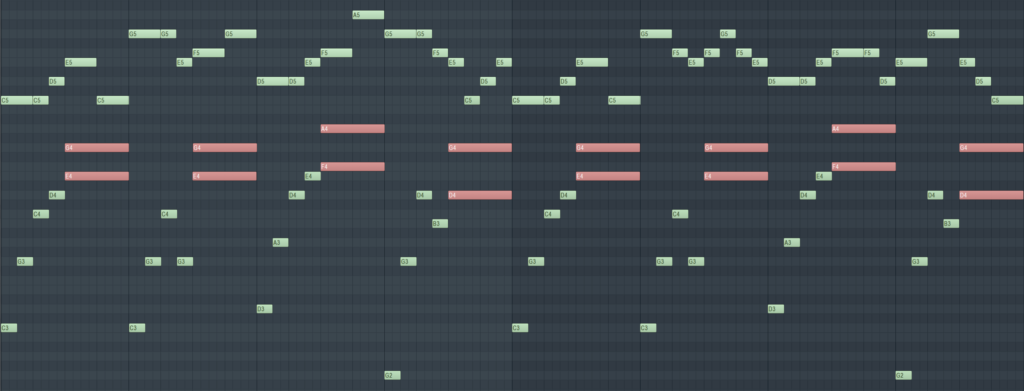
Adding 3rd and 4th onto your melodies can make your songs more harmony rich, but personally, my example above was a bit too busy, a bit opposing to the clean and pure tone of the original melody. Thus, you may add counterpoint only for some part of the melodies. In this example, let’s also include some 5ths and 6ths downward intervals into the arrangement, highlighting the notes only for every 2 beats:
Now this is a bit more balanced, as there are some occasional notes to decorate the melody while it is not overwhelming and frequent. This is only some of the examples to apply counterpoints, and how you apply these notes are up to your feeling, as long as it sounds appealing to you and it is possible to play with our hands. (If you have no idea, a chord spanning an octave should be safe for nearly all piano players although there are tricks to reach greater intervals.)
Part 4: Let write the complete arrangement
At these point, we have covered many basics of writing a better accompaniment for our pieces, so let use the things we have learnt previously, rewriting the piano piece till the end of phrase before the kick drum kicks in as the original arrangement.
At the beginning of the track, instead of a pure melody, I prefer to have some soft chord, so I have added them with a bit of delays for the higher notes, creating the arpeggiated** chord effect as described in the notation that give a softer attack for your chords.
For the following bars, I have applied the simple upward arpeggios with a pause to provide more movements for the melody, along with some counter points and chords when a new idea is introduced for the next four bars. At the end of the phrase, instead of ending with a single C note, I have added some arpeggiated** chord.
** Don’t mistaken with the arpeggios in Trackers since arpeggiated chord in music theory triggers once only while the arpeggio command in trackers are triggered repetitively.
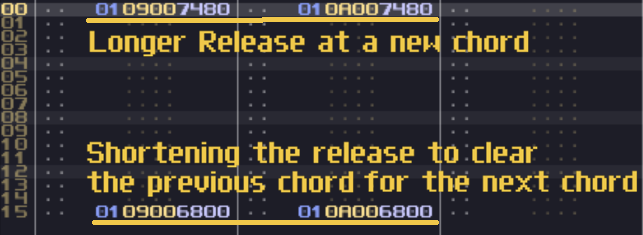
There is one more simple trick to make your arrangement more realistic which is the use of sustain pedal. Since such pedal doesn’t exist for most of the piano modules, you may change the release parameter of the modules of choice to emulate the pedal effect. You may apply a shorter release for the module right before a chord change and change it back right after the chord is played, mimicking how we use the sustain pedal on the real piano.
With all the things we have learnt and applied, we could write something like this:
As you can see, this piece now has more movement and depth while the new piano sound creates a soft and peaceful feeling, all done with the tricks we have learnt above. While these tricks are effective, they are not difficult to follow since they are all based on simple arpeggios and broken chord but up scaled, spanning through more than one octave, along with some harmonies added for the melodies. Thus, with a few experimentation and practices, you may able to write something like these.
Part 5: Extending the concepts to something irregular
Previously, we have covered some of the basics of piano accompaniments that are good and easy to follow for many situations, but we want more complexities sometimes, so in this part, let’s just flex a little by adding some more techniques, but it might be tricky at time since many of the decision are done with my personal feeling what it sounds right for me, so don’t worry if you are not understood at first glance.
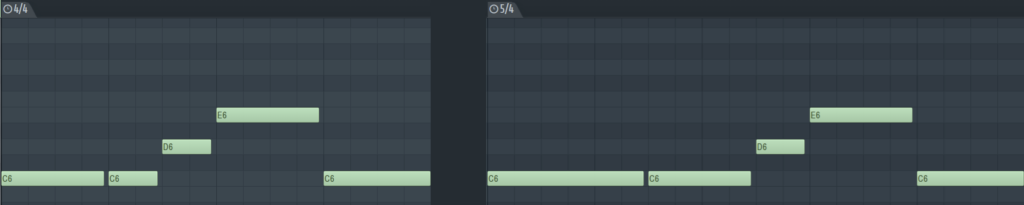
After granted the use of this SunVox Entry, I have an impulsion of writing this piece with less common time signatures, and it is not just using one time signature, but mixing and matching different timings that I feel it sounds great. Thus, at the intro, I have alternately used 5/8 and 6/8 which I found it flows well, and after the intro, the use of the two time signatures are purely based on my feelings. Even though such a complex timing, the principle of the accompaniment is still the same, consisting arpeggios.
Clearly, putting a melody written in 4/4 doesn’t fit in a bar of 5/8 and 6/8, so we need to use syncopation, stretching the melody, letting some of them playing at the up beat so that it flow smoothly, and the process doesn’t require you to use much advance music theory or calculation, and it is the matter of you feeling the stretch that works the best.
At one point, I think the melody staying at the same range sounds a bit boring, and since it often clash with the bass, I decided to rise the melody by an octave after the melody has been introduced after 4 bars, entering with a simple chromatic runs, brighten the melody a little while provides a lot more rooms for the counterpoints.
Speaking of the counterpoints, even with such a variable time signatures that changed based on my feeling, the principle are identical where I just apply them on the first beat of the bar, and sometimes at the last two quarter notes, just to highlight the rhythm of the track using addition harmonics.
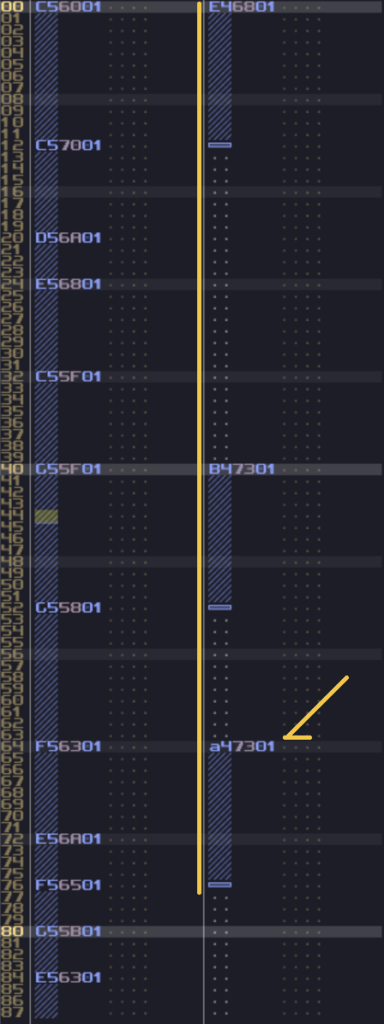
Thanks to the Tracker view, we usually write the melody and counterpoints at their corresponding column, and this is useful to visualize the voicing since you may chose to prioritize which line of voice for the center of attention, and even doing something interesting.
In one of the sections of my arrangement, there is a sequence of counterpoints playing at the first beat of the bar in a downward motion from E4 -> B4 -> A4, and I just find it sound nice and smooth by adding the Ab4 between B4 and A4, turning the chord of the bar from C major to C Dormant 7 unconsciously. Since that is also a continuous sequence, you could emphasize the line as well, acting like a counter melody, so this is the reason why this three notes play louder than the melody.
The “chorus” part are nothing special since they are used the same idea above, with stretching things that align to the time signatures.
Eventually, I want to repeat the “chorus” part, but if we play the same composition again, the piece might not be as interesting, so I decided to swap hands, where the left hand plays the melody while the right playing some high and light arpeggios to have that quiet and pure tone. This can also shows the role of hands in playing piano are not static that the left hand must be in accompaniment while the right hand must be in melody, and you can swap the role as you like as long as it doesn’t lost clarity.
The good thing to the original melody is its pureness and simpleness, so I can further decorate the melody with some grace notes, turns, and some runs linking between bars to make it more lively, but since these ornaments and runs can be complicated topics, I am not going to cover these in this article for now.
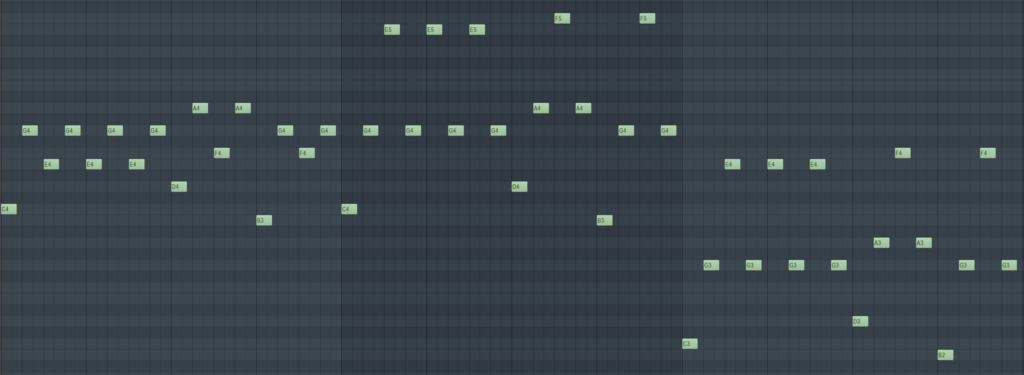
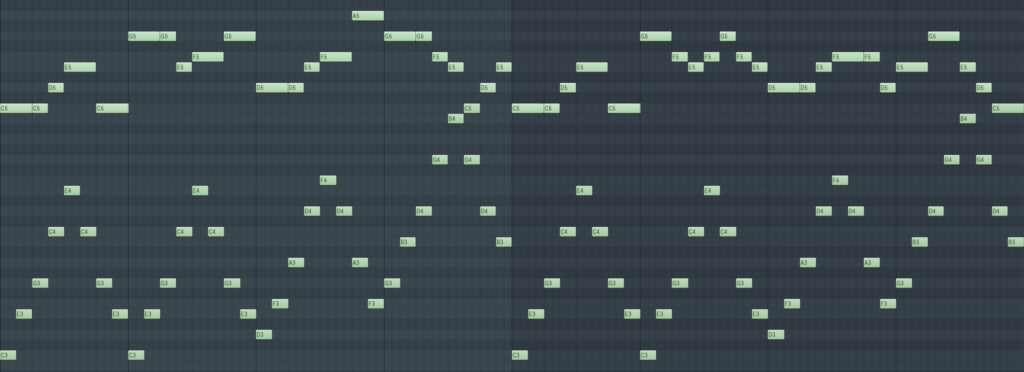
Nonetheless, with all the things above, I have rearranged the piano piece as the following:
I originally have planned to added some soft shaker and clicking percussion into the track to highlight the rhythm of the piece, along with a soft string section filling the harmony at the back; unfortunately, there are other tasks takes the priorities, so I have to stop here for now. Hopefully, I will have some time to complete the extended version of the piece in the future, but for now, this example should be more than enough to demonstrate the ideas of this article because the point is: Even with such a complicated time signatures, you can still use the same principle to write quite a lot of cool accompaniments with your melody.
Alright, this is pretty much about some basic ideas for your piano accompaniments, and hope these could help you to write a more expressive piano piece in SunVox. Let me know if you have any questions down below.
i love this! the tip to rewrite the melody in a different meter is especially nice, a little irregularity in the rhythm can really augment a melody. even though you didn’t cover this, ornamentations are probably the most fun part of writing a melody in my experience, despite it relying somewhat on the ear
and yeah the Eiki Piano module is good for 11kB! real nice module for 2021
The ornamentation part is unfortunate since it is really just hard to tell what is the best way to write them and it is purely by our feelings which is too vague as a tip or a guide. There are a lot of hard rules to write a smooth run, like using scales, arpeggios or chaining ornaments like turns or mordents, but at the same time, there are a lot more ways to break the rules in order to get the best fit into the composition.